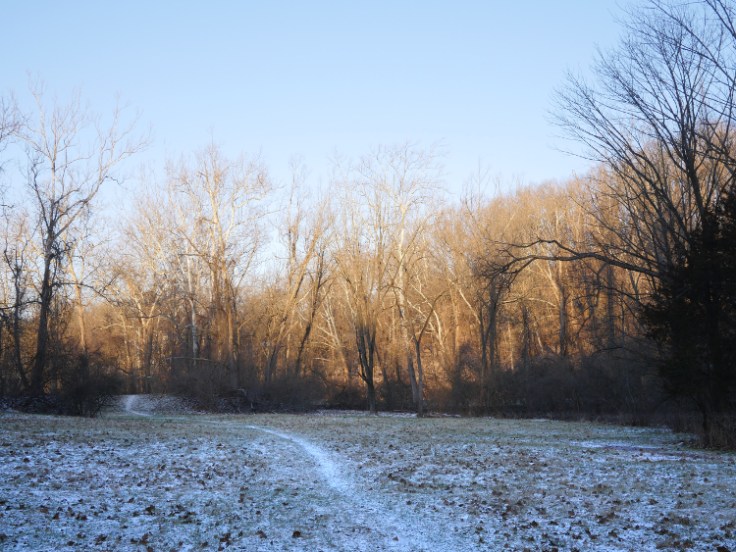
Week 2: Landscape: Traditional Landscape – Shoot a beautiful landscape and share it with the world. Find a nice foreground and don’t forget the sky.
I have been surprised at just how difficult this activity has become for me right out of the gate. I guess that’s why it was called a “challenge!” Although I didn’t make it clear in my first post on this subject, Dale’s list is broken into three types of photography: portrait, landscape and artistic impression. Personally, I feel I am fairly strong in the third category (artistic impression), as this is my comfort zone, while I am improving in the second theme (landscape), and the first category (portrait) is largely unexplored territory for me to date, other than through reluctantly granted periodic “family portraits”. In part, that’s why I took up the challenge in the first place – to push me into areas that I would not normally explore.
So, if I’m reasonably comfortable with landscapes then why was week 2 a challenge, after all it was a simple assignment? Well, to be honest it’s the time pressure. I am trying to really focus on this challenge (no pun intended) and one image every seven days does not sound like a tall order, but in reality it is. Each day this week I have looked at the weather and my schedule and tried to plan a time to be outside for a landscape shot. Given that I also have a full-time day job to attend to and that my office, although not in the city, isn’t exactly surrounded by bucolic riparian scenery this has been a little difficult.
Nevertheless, today my time was nearly up so I girded my loins for the challenge and decided to get the shot before I arrived at the office.
We do have a small country park about a mile or so from my workplace so I drove there as the sun was coming up in anticipation of being able to achieve my aim. Last night was particularly cold and the car thermometer read 19F (-7C) as I stepped outside this morning, so a little bit chillier that I’d like when dressed for the office. I took my trusty micro four-third Panasonic GX-8 from it’s bag and, although I am really obsessed with zoom lenses, fitted on the 20mm f1.7 (40mm equivalent), as the more “classic landscape” prime lens, so I am told. Strolling away from the otherwise empty parking lot the wind hit me. I swear my fingers seem to freeze instantly and my face began to sting. To be honest, these temperatures aren’t at all unusual in Pennsylvania this time of year but we have benefited from such a mild winter to date that I guess I am just not acclimated to it, yet!
Anyhow, I walked the park for as long as I could stand, tried to get what I would consider to be a serviceable, yet perhaps not overly inspiring, image for this challenge and then headed back to the warmth of the car.
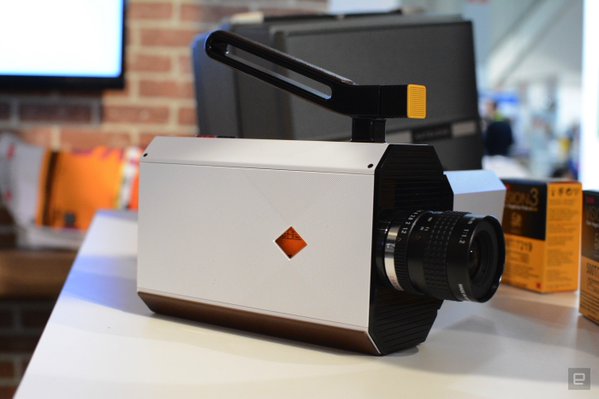
Despite having the latest technology available to me through my micro-four thirds cameras, and having chosen from a company that espouses the use of multimedia creation, I am not much of a video maker. I prefer still photography and leave my 4K-enabled video features on my Panasonic GX-8 largely unexplored to date. However, serendipity being what is is, I had just read an interesting book with the lengthy title Pictures, Pop Bottles and Pills: Kodak Electronics Technology That Made a Better World But Didn’t Save the Day by K. Bradley Paxton on the history of Kodak and its demise and was therefore surprised to learn this week that the company is to launch a “new” version of its famed Super8 system.
The original Super8 camera was the the mainstay of capturing those family events throughout the 60’s and beyond, until it was superseded by the convenience of home video cameras, which in turn were replaced by digital cameras, so what are Kodak up to?
A quick look through the Kodak blurb on their website provides some useful specifications, but in summary the camera will use 50 ft (15m) of 8mm film at speeds of 9-25 fps. Each film fits 72 frames per foot, which purportedly provides 3600 frames per film cartridge* (2.5 minutes of filming). The camera uses a manual focus, fixed 6mm 1:1.2 Ricoh C-mount lens (optional 8-48mm zoom), but with a 3.5cm LCD TFT tiltable viewfinder.
It all sounds like an interesting mix of retro and modern but to the $64,000 question: will it sell?
Personally, I don’t mind retro styling, as I stated in my Recesky post, and my kids all use their Fuji instax cameras to produce instantly gratifying (to them, at least) images for them to share so I think there is definitely a market for retro styling and products that are marketed to capitalize on a sense of nostalgia in an era of relentless progress. Kodak are also touting the fact that some big name directors, such as Spielberg and Abrams praise the use of film over digital capture for developing technique, but I see the main issues here are two-fold:
With a proposed price of $400 – $700 for the camera and at $75 for a 2-3 minute film, this really is quite a luxury niche product; and
Can today’s consumer, with a need for instant gratification, really wait a couple of weeks to get their (pricey) Super8 film processed?
The second point is a paradox that Kodak seems to be happy to test: perhaps the lost pleasure of anticipation though a prolonged wait to see the final creation will drive a new dawn of creativity. Who knows? Maybe we’ll see a whole new generation of editors sat at splicing desks?
In the end only time will tell whether the big K will get another “Kodak Moment”
*to be honest I am not sure how this works as 1 ft = 304mm. If each frame is 8mm then this should be 304/8 = 38 frames per foot. Perhaps someone can explain this to me?
This is a digital pastel image created on a blank canvas and inspired by the most expensive photograph in the world, Rhein II by Andreas Gursky. It fascinates me that Mr. Gursky’s photoshopped image was able to command such a staggering sale price and my digital composition pays homage to his great skill. I am indebted to my wife, Michelle, for aiding me with pastel technique and allowing me to bridge the real and digital worlds to create a digital pastel image from scratch using the free image software, GIMP.
Background to the original work
Rhein II is a photographic image created by German visual artist Andreas Gursky in 1999. In 2011, a print was auctioned for $4.3 million, making it the most expensive photograph ever sold. (Although Peter Lik has reportedly sold an image entitled “Phantom” for $6.5 million in December 2014 this sale has not yet been verified).
The photograph was produced as part of a series of six depicting the River Rhine. In this image, of the second of the series, the Rhine flows horizontally across the field of view, between green fields, under an overcast sky.
Gursky digitally manipulated the original photograph to remove passersby and a factory building stating that “Paradoxically, this view of the Rhine cannot be obtained in situ, a fictitious construction was required to provide an accurate image of a modern river.” Gursky produced a very large chromogenic colour print of the photograph, mounted it onto acrylic glass, and then placed it in a frame. The image itself measures 73 by 143 inches (190 cm x 360 cm).
The print was originally acquired by the Galerie Monika Sprueth in Cologne, and subsequently bought by an anonymous German collector. The collector sold the print by auction at Christie’s New York on 8 November 2011, for $4,338,500 to an anonymous buyer.
The work has been described by arts writer Florence Waters in The Daily Telegraph as a “vibrant, beautiful and memorable – I should say unforgettable – contemporary twist on […] the romantic landscape” and by journalist Maev Kennedy in The Guardian as “a sludgy image of the grey Rhine under grey skies”.
Either way I thought it would be ironic to create a digital painting of this photograph in a retro-homage to this great artwork.
The hackneyed idiom, “a picture paints a thousand words” comes not from the mystical East as I had suspected but from a rather more modern source, having appeared in a newspaper article quoting editor Tess Flanders discussing journalism and publicity. At least that’s what Wikipedia tells me today.
It is also said that a great photograph evokes a story to the mind of the person who looks upon it.
This was certainly the case when I was on a trip to Nassau last year and took this shot of the derelict Coral World glass bottomed restaurant. In fact, it inspired me to generate a short story to accompany it, albeit under 500 words in length, not the requisite 1000…
The Visit
Had it really been 40 years ago that it all happened? The old man looked across at the dilapidated building sitting in Nassau Harbour. It seems like only yesterday, he thought to himself. The other passengers boarding the boat to Balmoral Island chattered idly and pointed at the huge cruise liners docked opposite the Straw Market. They were more like floating cities than ships, disgorging excited tourists onto the quayside. The powerboat gently pulled away and soon slid out past the container ships unloading their steel boxes of goods at the port. It was amazing to see how the huge cranes picked up these heavy containers like a child playing with Lego blocks. So much had changed.
The tower was clearly visible now. Surprisingly few people seemed to even recall what it had been. But he remembered. It was strange to think that that so much violence could have emanated from such a serene location. He recalled running across the narrow bridge from the island to the hub, looking up at the tower, the noise of gunfire behind him. How he wasn’t hit truly amazed him. He certainly thought that dashing along a straight line was a long shot but it was the only way he could see to stop the madness in time. His partner hadn’t been so lucky. Just as they had made the door, she had taken a hit. Still, we all knew the risks, he thought. Once in the hub it had been remarkably easy to find him sitting in his chair like a Roman Emperor. Who on earth did he think he was? He had looked almost serene as if he expected to be disturbed yet it appeared for all his insanity he hadn’t expected the sheer brutality of what happened next. Perhaps he thought that an Englishman would play by some arcane Public School rules. But times had changed, even way back then. All the training had paid off. No need for those silly gadgets, just highly-controlled violence. It was all over in a few seconds, although it seemed much longer. Another job done.
Strange how time plays tricks on you like that, he thought.
He was returned from his memories by one of the other passengers. “Would you mind taking a photo of us with that derelict tower in the background, please?” He willingly obliged, feigning ignorance of the simple camera phone’s capabilities. “Thank you, are you staying at the Hotel?” she enquired. “No,” he replied, “just passing through. Reliving dangerously.”
One of the reasons for writing this blog, other than to pander to my ego, is to start to draw a thread through the various bits and pieces of fractured connections I have put on the web over the last few years. That and to get people looking at my art site, obviously!
However, it’s not all about me – no really, it isn’t – I also want to share some of the activities I have found useful, and fun in being able to promote my work. One example that may not always spring to mind for the photographer or artist is the potential use of videos to provide an opportunity for people to see your work. What, I hear you say, how does that make sense? Well, in my case I am not talking about creating documentaries but rather a simple slideshow of related photographs which perhaps show a shared theme or tell a story.
By way of example, about a year ago I put together this video of some images taken with my Recesky camera that I described in an earlier post. This was quite easy to do using the intuitive, and free, Windows MovieMaker, and I was pleased with the result. See what you think.
One of biggest challenges in compiling such a video was identifying appropriate music to accompany the slideshow, while being very careful about copyright infringement. A quick search of the web shows that there are several sources for getting great royalty free music to use, and in my case I used ccMixter to locate a suitable track and then adjusted the slide transition timings in MoveMaker to meet with the music timings. I don’t think J.J Abrams has anything to fear from me, but it was fun learning something new and to enjoy a different method of artistic expression.
I will try to live up to my blog subheading “Philosophical Photography & More,” at least in part today, by recounting the events of this morning… My wife, Michelle, is an artist who was finishing a watercolor for entry into a local art exhibition today, along the theme of “clean slate.” For this she produced an image of a Monarch butterfly emerging from its cocoon, entitled “Rebirth” which she asked me to frame.
I asked her for details of the work and uploaded it to her online gallery but, in doing so, I noticed that today’s Google Doodle also featured a butterfly design.
That’s odd, I thought, and clicked the link to find that today is the 41st anniversary of the discovery by Ken Brugger and Catalina Trail of the Mountain of Butterflies, and more specifically Monarch butterflies. After many years of searching and tracking Monarch butterflies this spectacular site in Mexico was finally discovered on January 9th 1975 (although it was well known by locals for hundreds of years). The site has now been made a World Heritage site where over one billion of these lepidopteran beauties spend the winter.
So, back to the main point of this post: a close friend of mine who is considerably more spiritually inclined than I would ever admit to being, would probably say this is fate, the gods, or the universe sending a message to either me or my wife, or perhaps to us both. Maybe this is a sign that heralds a metamorphic change for us. Who knows, only time will tell…
Personally, I just say “wow, that’s weird” and let it pass, but it certainly makes for a mildly interesting story. What do you think?
One of my online activities is to curate/administer a group of artists who share images related to themes that are Quintessentially British. This is something that I will explain at tedious length in a later post or two, but for now let me say that one advantage of being a member of this group is the sharing of ideas. One member, James Canning shared a great online tool for photographers that allows us to visualize the effect of changing the parameters of your camera on a set scene, all interactively. The flash-based application is called CameraSim and I think it does a pretty good job of explaining, or rather showing, how to operate a more advanced camera.
As you can see from this static screenshot (in the live site the girl and her windmill are moving!) you are able to adjust not only the shutter speed and aperture but also the ISO, lens (focal length), distance of subject and even lighting. I think this is a great tool for understanding the mechanics of photography and I thought it would be a great item to share here.
As the developer says on the page: “Happy Simulating!”
In late December I stumbled across this “52-week challenge” for photographers compiled by photographer Dale Foshe. The internet is full of many similar themes (or memes?) this time of year but this one was the first I saw so I am taking it to heart and going to try to see how long I can stick to it. I won’t repeat the whole list here, as you can use the link above to find it, but I will try to post the relevant image I have taken each week to show my progress. I know from my previous experience on such challenges that it is going to be tough to try and keep to this but I will try, and at the very least it should ensure I have one blog item posted each week throughout 2016, so I have no excuses for getting “writer’s block” for this year! I will also include some thoughts about why I made each image (getting a little philosophical here, perhaps…)
Here goes:
Week 1: Portrait: Self-portrait – Start things off right with a “selfie!” Explore the self timer setting on your camera
OK, well I have partially fallen at the first hurdle! I remembered it was a selfie but, until I came to write this blog post I had forgotten that it said to use the self-timer! With today being the end of the first week of the year I’m not going back now and I’ll explain my reasoning (deep breath):
I don’t normally take many pictures of myself and, as the “family photographer” I am generally the one behind the shutter at most family gatherings. I also am not overly keen on being in photos, to be honest. However, in thinking about this (albeit incorrectly, it would now seem) I considered that the only time I actually see myself is when I am shaving in the morning, eyes half-open, face covered in shaving soap as I squint into the mirror. So, here’s the shot:
52:1 The Selfie
Note that I have reversed the image so that it represents how I see me, not how the world sees me and the only other artistic liberty I have taken with this is to keep it in black and white, oh and to smile slightly!
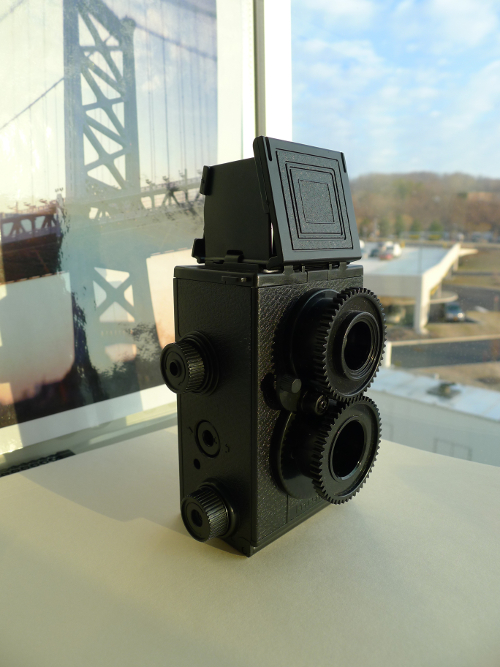
Don’t get me wrong, I’m not some type of Luddite or traditionalist harping on about the good old days of film photography and how everyone now thinks they’re a fine art photographer just because they own an iPhone; I am as much a geek as many other photographers, with my main choice of hardware being my trusty Panasonic GX-1 with the “new-fangled” m43 format rather than the more usual DSLR. That being said, I was fascinated to stumble across the Recesky TLR camera that could be built in a couple of hours and use widely available 35mm film – for about $20.
I had dabbled with a Holga using black and white 110-film over the last couple of years, learning with my daughter as she went through her photography classes at school, and maybe that helped pique my interest to temporarily put away the Panny, turn off the laptop and go back to real basics. Additionally, with the use of widely available 35mm color film which could be processed cheaply locally, this opened up a lot of creative possibilities using the quirky plastic lens system with its quirky vignetting effect.
There is quite a lot of information available on the internet regarding the Recesky camera, and its more up-market, but similar version, the Gakkenflex, some of which can be off putting to the reader since it over dramatizes the complexity of the task at hand. In reality the whole exercise of building the camera took me only a couple of quiet hours and is very straightforward providing you do your preparation work, read all instructions carefully and, most importantly, take your time.
Sourcing the camera kit is easy – just type Recesky into Amazon or eBay and you will find several sellers. You should be able to get this for $20 or less including shipping. The kit comes in a styrofoam box and you should be very careful about unpacking this and making sure all parts are present, as some are very small, easily lost and not replaceable. My kit only had instructions in Chinese so I printed out English instructions on the internet and read a few “diy” blogs (see below) before I started. One thing I recommend is that you dedicate a couple of quiet hours to this as you don’t want to be disturbed when fiddling with small plastic components and springs and you certainly don’t want your part-completed kit sent flying by children or pets.
Construction is fairly straightforward, once you relax into it and realise that you may have to do, undo and redo pieces a few times to get it right. The main thing to remember is to not force anything and, if you are unsure, to refer not only to the instructions but to the growing number of youtube videos available. The most difficult part is putting together the shutter release mechanism. It is quite surprising how a couple of cheap springs, a pinhole and and a plastic flap can make a fairly reliable shutter.
Once all the parts are together the Recesky is fairly robust, for a cheap plastic camera, with the exception of the flip up viewfinder mechanism which seems to fall apart quite easily until you work out how to open it carefully. This does not affect the camera’s operation though, since if the 4 parts detach they can just be snapped into place, but it did frustrate me to start with.
Loading a 35mm film (ISO 400 recommended, but it’s not critical) is easy, although, as with Holga cameras, you have to experiment a little with your particular build in order to get the the film tension correct to ensure it flat on the focal plane, but it’s not totally critical. I added a small piece of card from the film box between the end of the film spool and the camera body to make the film fit more tightly and increase the film tension. Close up the back and you are ready for action with your half-sized, fake Rolleiflex.
The first thing to notice on the outside of the camera is that there is no film counter. Instead the take up spool has an arrow embossed on it. When winding the film on the arrow needs to move half of a revolution to have advanced the film a full frame. Therefore you need to be in the habit of either remembering to advance after every shot so that you are ready to take your next picture and not get a double exposure (unless you want to do that!)
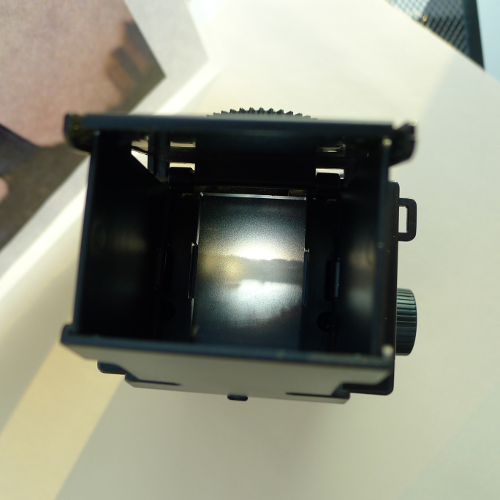
The Recesky is a TLR (twin lens reflex) so you don’t see exactly the image you are going to
Looking through the viewfinder at a reversed image takes a little getting used to
get as there will be parallax effect between the viewing lens and the camera lens. This is not a significant problem for distance work but gets problematic with close ups. Focusing, such as it is, can be achieved by winding the lenses, which are meshed together, in and out and viewing the scene through the “ground glass” (plastic) viewfinder. Note the image is upside down so it takes a bit of getting used to moving and tilting the camera in the opposite direction to what you think. Also the viewfinder is very dim so the camera is best used in bright sunlight if you want to rely on the viewfinder to compose your shot.
Once you have run through your film it can be developed quite cheaply at many drugstores, camera shops or big box stores, since it uses standard 35mm film. This is a huge advantage over the Holga cameras with their 110 film format, which we had to wet process ourselves.
Maybe it’s just me but the other thing that I like about this whole activity is the introduction of an anticipatory element to the creative flow. Instead of simply pressing the arrow and looking at the image on the camera LCD you have to wait until the entire film is shot and then wait hours or days for the photos to be produced. I also suggest you also get JPG versions on a DVD too if you can unless you want to scan the negatives or prints yourself to a higher quality format.
The images that the Recesky produces are quaint, often unexpected and have that natural retro feel, with vignetting and soft focus. Even mundane objects take in a different appearance and it is for this reason that I will often use my digital and my Recesky when I am on a shoot, to compare the imagery afterwards. I guess no two cameras are truly the same although the Recesky camera body is significantly more light proof than the Holga, so you don’t get that light bleed effect for which the latter is so well known – or at least I don’t.
The other thing with the Recesky is that it is relatively compact so you can pop it in your jacket pocket and take it wherever you go. It’s also fascinating to see the people’s expressions when composing a shot with the camera – usually a look of bewilderment as they assume you are, in fact, using some hi-tech equipment, radar detector, measuring device or 3-D camera. Some people’s curiosity will even get the better of them sufficiently to ask what it is!
So, in conclusion if you want to try something a little different from your normal routine, don’t want to spend too much money that you could spend on glass for your digital equipment, but are prepared to put in some time and patience, then why not give this a go and join the fun of not being entirely in control of how your final art will reveal itself!
I have uploaded a small gallery of shots taken with this box of fun here
Wow – has it really been two years since I started this blog and then almost immediately abandoned it? How dreadful!
I admit that I have not put the effort into working out the best way to use WordPress, but it’s time to pick up the pieces and start posting here again to supplement the time I have been spending over on my art site ReevePhotos.com and also on twitter and pinterest. I have also been busy curating the online art group Quintessentially British which now has 600+ members and nearly 10,000 images that are associated with Britain in some “quintessential” way. Why not take a look?
Finally, I was going to do a complete reset on this blog and delete the old posts but then I thought no, they are part of my rambling history so I may as well leave them…
Adventuring the globe whilst based in the beautiful PNW, with a focus on fitness & adventure travel, conservation and a healthy balanced lifestyle. All with my beautiful partner in crime, Stephanie!